

カテゴリー追加する機能を実装するのを失念していたので追加。
1. 新しく作成するファイル
① 画面(ビューファイル)の新規作成
ローカル環境の resources/views/ 内に categories というフォルダを作成し、その中に index.blade.php を新規作成して以下のコードをすべて貼り付けてください。
📄 resources/views/categories/index.blade.php (新規作成)
@extends('layouts.app')

@section('content')
<div class="container mt-4">
    <h2>カテゴリー管理</h2>

    <!-- 🌟Bootstrap 5の機能:メッセージの右側に「×」ボタンを表示し、クリックでフワッと消せる通知スタイルを採用 -->
    @if(session('success'))
        <div class="alert alert-success alert-dismissible fade show" role="alert">
            {{ session('success') }}
            <button type="button" class="btn-close" data-bs-dismiss="alert" aria-label="Close"></button>
        </div>
    @endif

    <div class="row mt-4">
        <!-- 左側:新規追加フォーム -->
        <div class="col-md-4">
            <div class="card shadow-sm">
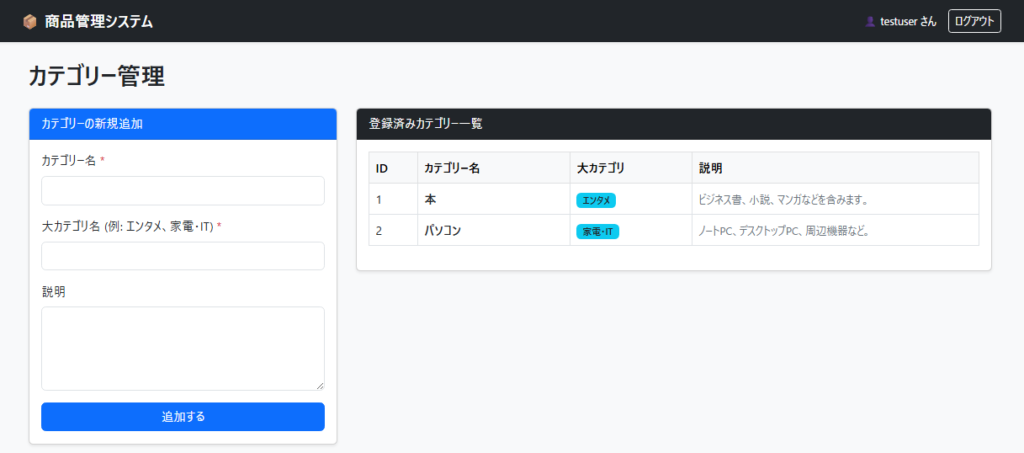
                <div class="card-header bg-primary text-white">カテゴリーの新規追加</div>
                <div class="card-body">
                    <form action="{{ route('categories.store') }}" method="POST">
                        @csrf
                        <div class="mb-3">
                            <label for="name" class="form-label">カテゴリー名 <span class="text-danger">*</span></label>
                            <input type="text" name="name" id="name" class="form-control @error('name') is-invalid @enderror" value="{{ old('name') }}" required>
                            @error('name')<div class="invalid-feedback">{{ $message }}</div>@enderror
                        </div>

                        <div class="mb-3">
                            <label for="major_category_name" class="form-label">大カテゴリ名 (例: エンタメ、家電・IT) <span class="text-danger">*</span></label>
                            <input type="text" name="major_category_name" id="major_category_name" class="form-control @error('major_category_name') is-invalid @enderror" value="{{ old('major_category_name') }}" required>
                            @error('major_category_name')<div class="invalid-feedback">{{ $message }}</div>@enderror
                        </div>

                        <div class="mb-3">
                            <label for="description" class="form-label">説明</label>
                            <textarea name="description" id="description" class="form-control @error('description') is-invalid @enderror" rows="4">{{ old('description') }}</textarea>
                            @error('description')<div class="invalid-feedback">{{ $message }}</div>@enderror
                        </div>

                        <button type="submit" class="btn btn-primary w-100">追加する</button>
                    </form>
                </div>
            </div>
        </div>

        <!-- 右側:現在の登録一覧 -->
        <div class="col-md-8">
            <div class="card shadow-sm">
                <div class="card-header bg-dark text-white">登録済みカテゴリー一覧</div>
                <div class="card-body">
                    <table class="table table-hover table-bordered align-middle">
                        <thead class="table-light">
                            <tr>
                                <th style="width: 8%;">ID</th>
                                <th style="width: 25%;">カテゴリー名</th>
                                <th style="width: 20%;">大カテゴリ</th>
                                <th>説明</th>
                            </tr>
                        </thead>
                        <tbody>
                            @forelse($categories as $category)
                                <tr>
                                    <td>{{ $category->id }}</td>
                                    <td><strong>{{ $category->name }}</strong></td>
                                    <td><span class="badge bg-info text-dark">{{ $category->major_category_name }}</span></td>
                                    <td><small class="text-secondary">{{ $category->description ?? 'なし' }}</small></td>
                                </tr>
                            @empty
                                <tr>
                                    <td colspan="4" class="text-center text-muted py-4">カテゴリーが登録されていません。</td>
                                </tr>
                            @endforelse
                        </tbody>
                    </table>
                </div>
            </div>
        </div>
    </div>
</div>
@endsection
② コントローラーの新規作成
app/Http/Controllers/ 内に CategoryController.php を新規作成し、以下のコードをそのまま貼り付け。
📄 app/Http/Controllers/CategoryController.php (新規作成)
<?php

namespace App\Http\Controllers;

use App\Models\Category;
use Illuminate\Http\Request;

class CategoryController extends Controller
{
    public function index()
    {
        $categories = Category::all();
        return view('categories.index', compact('categories'));
    }

    public function store(Request $request)
    {
        $request->validate([
            'name' => 'required|string|max:255|unique:categories,name',
            'major_category_name' => 'required|string|max:255',
            'description' => 'nullable|string|max:1000',
        ], [
            'name.required' => 'カテゴリー名は必須です。',
            'name.unique' => 'そのカテゴリー名は既に登録されています。',
            'major_category_name' => '大カテゴリ名は必須です。',
        ]);

        Category::create([
            'name' => $request->name,
            'major_category_name' => $request->major_category_name,
            'description' => $request->description,
        ]);

        return redirect()->route('categories.index')->with('success', '新しいカテゴリーを追加しました!');
    }
}2. すでにある既存ファイルの修正(2つ)
① 商品一覧(Products)画面へのボタン追加
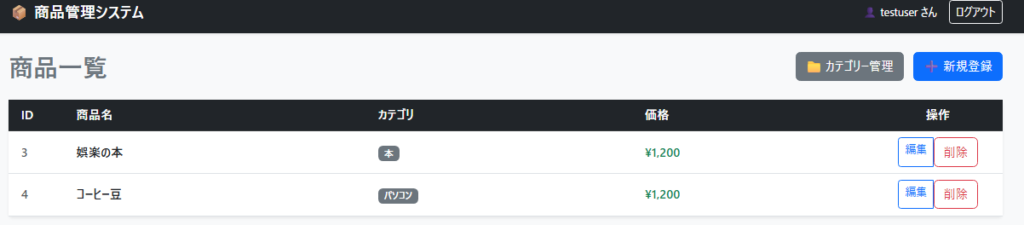
既存の resources/views/products/index.blade.php を開き、「新規登録」ボタンがあるエリア(通常は <h2>商品一覧</h2> の近く)を探して、「カテゴリー管理」ボタンを左側に追記します。
📄 resources/views/products/index.blade.php (既存修正・ボタン追記)
<div class="d-flex justify-content-between align-items-center mb-4">
    <h2>商品一覧</h2>
    <div>
        <!-- 🌟追記:カテゴリー管理画面へ遷移するボタン(グレーの落ち着いた配色) -->
        <a href="{{ route('categories.index') }}" class="btn btn-secondary me-2">📁 カテゴリー管理</a>
        <a href="{{ route('products.create') }}" class="btn btn-primary">➕ 新規登録</a>
    </div>
</div>② ルーティング(URL設定)の追記
既存の routes/web.php の一番最後の行に、以下のURL設定コードをそのままコピーして貼り付けて保存してください。
📄 routes/web.php (最下部に追記)
use App\Http\Controllers\CategoryController;

// カテゴリー管理機能用のURL設定
Route::get('/categories', [CategoryController::class, 'index'])->name('categories.index');
Route::post('/categories', [CategoryController::class, 'store'])->name('categories.store');3. 仕上げのコマンド実行
すべてのファイルを保存したら、ローカル環境のターミナル(VSCode内などのターミナル)で以下のルートキャッシュクリアコマンドを1回実行。
[root@almalinux ~]# php artisan route:clear4.表示確認
1.localhost/laravel-app/public/products にアクセスして、カテゴリー管理ボタンが表示されるか。
2.localhost/laravel-app/public/categories にアクセスして、カテゴリー追加画面が表示されるか。

コメント